Showing posts with label vegetarian. Show all posts

Wednesday, November 5, 2014

Frosted B-raw-nies

My kids love anything with a chocolate flavor, especially when they know it's secretly good for them. One of my favorite quick "desserts" to make them are these Frosted B-raw-nies. They are great right out of the fridge and even better frozen. I'll be adding these to my boy's school lunches tomorrow. I'm pretty sure they'll eat them first!


You can find the recipe at http://plantpoweredkitchen.com/recipes/recipe-brawnies/ or in Dreena Burton's book, Let Them Eat Vegan. 

I love the recipe as is, but this time I subbed the agave for maple syrup and added ground flax seeds to the nut mixture for some added Omega 3's.

Sunday, October 12, 2014

Vegan Pumpkin Bread


Vegan Pumpkin Bread


3 c pastry flour
1 t baking soda
1/2 t baking powder
1/2 t salt
1.5 T cinnamon
2 t nutmeg
1 t ginger
1/2 t cardamom
1/2 t allspice
1 t cloves


3/4 c coconut oil
1.5 c coconut sugar
2/3 c applesauce
1 c pumpkin purée
1 t vanilla
3 flax eggs (3 T ground flax seeds mixed with 9 T warm water)


1/4 c loosely chopped pumpkin seeds


Heat oven to 350F. "Grease" two loaf pans with coconut oil. Sift dry ingredients/spices into a large bowl. Whisk sugar and oil together then add in pumpkin, applesauce, flax eggs and vanilla. Pour pumpkin mixture into flour/spices, mix with a spatula until just combined. Divide batter between the loaves, sprinkle pumpkin seeds on top. Bake 50 minutes to 1 hour, or until a toothpick comes out dry.

Thursday, September 18, 2014

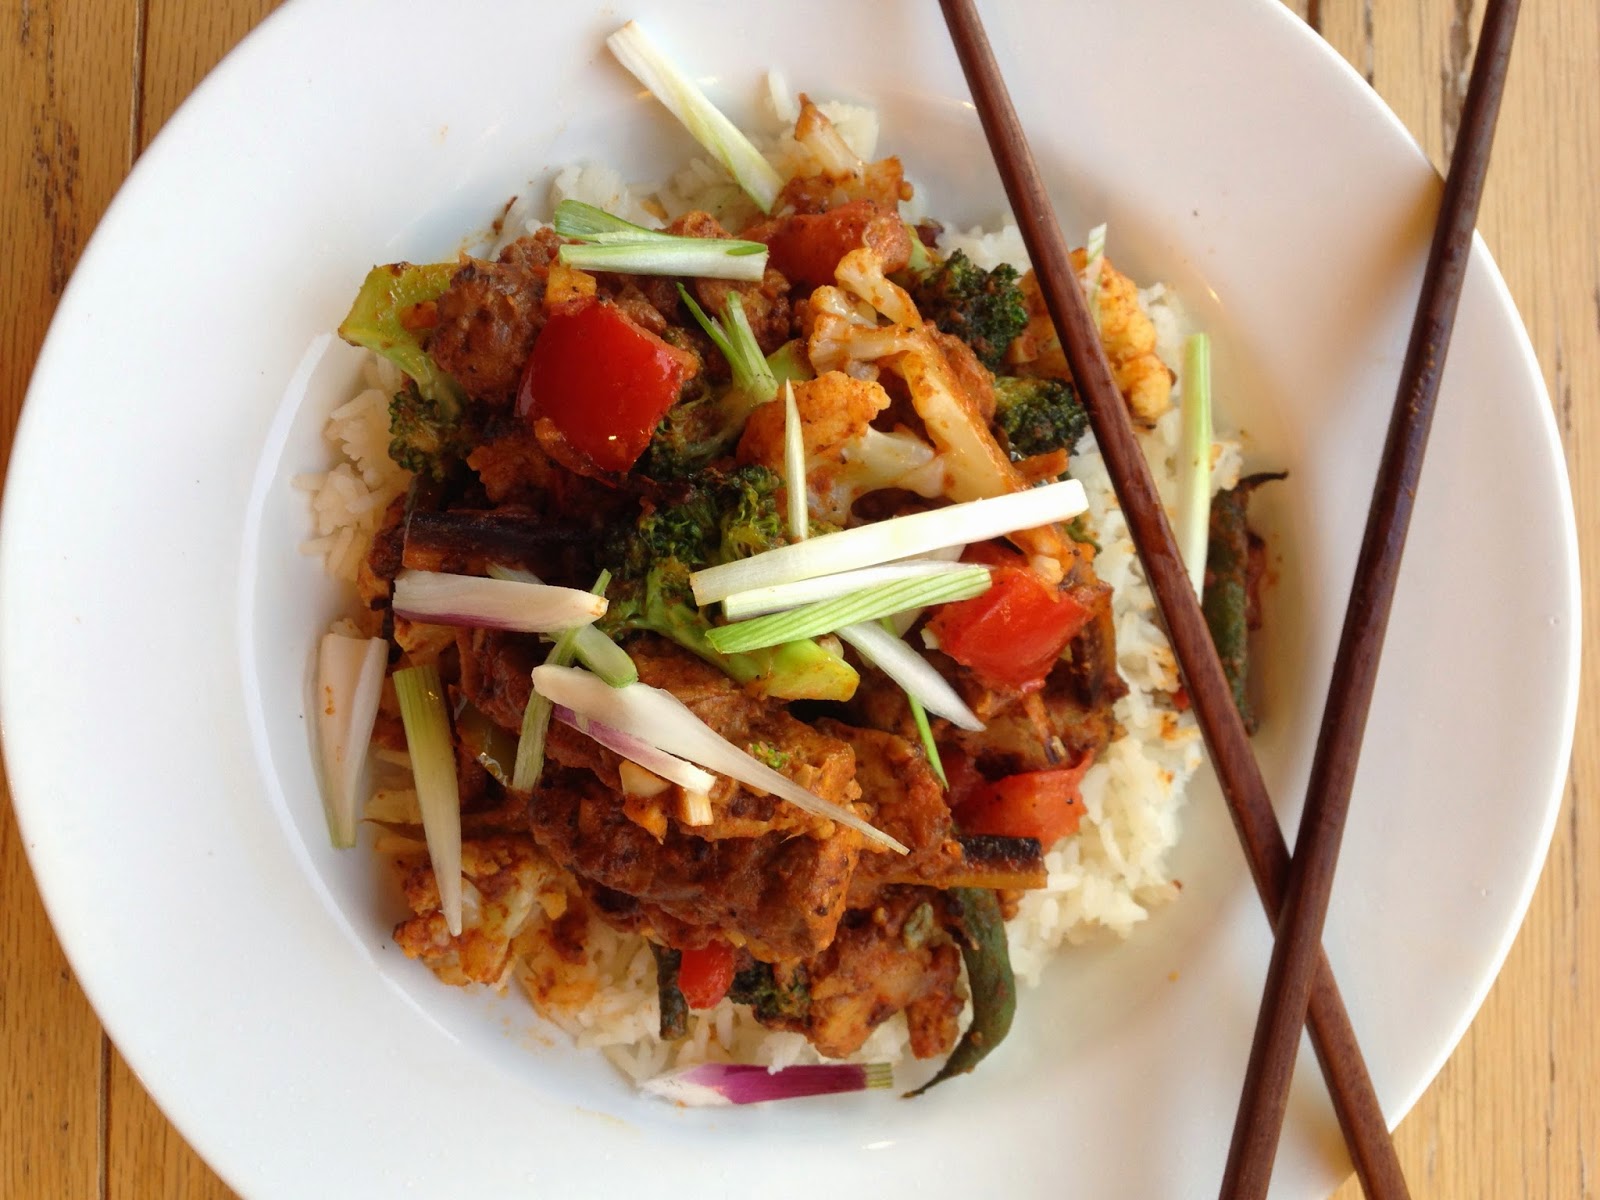
Red Curry Thai Tempeh Stir Fry

I graduated a month ago from the Rouxbe Plant-Based Certification Course. I learned so incredibly much in the course. I can't begin to grasp the plethora of information that was/is at my fingertips. I've heard that they might be adding more plant-based courses having to do with Raw Gastronomy and Pastry/Baking. If they do, you can be sure I'll be one of the first to sign up. 

During the course I gained a lot of confidence in my cooking skills. I suppose it was always there, but just lying dormant as I was nervous to branch out of my cozy little cooking bubble. Developing flavors was something I didn't know much about. Honestly, just in the last few years I've started integrating spices other than god ole salt and pepper into my cooking. 


This recipe has so many wonderful flavors and simple techniques. It's also my husband's favorite recipe that I wrote during the course. I am so happy to share it with you and I hope you love it as much as we do.


Red Curry Thai Tempeh Stir Fry

You'll need:
1-2 blocks organic tempeh, cut into thin slices (about 1/2" thick, 2" long)
3 T tamari
4 cloves garlic, sliced
1 t salt
1 inch ginger, sliced

3 yellow potatoes, cubed
1 c cauliflower, separated into small florets
1 c broccoli, separated into small florets
1 c bell peppers, cut into strips
1/2 c carrots, julienned
1/2 c fresh green beans, cut into 1 inch pieces
3 cloves garlic, minced
1 inch ginger, minced
1 medium white onion, diced
3 T red curry paste
1 c coconut milk
2 medium tomatoes, diced
2 green onions, julienned
4 T coconut oil, for stir frying

To soften the tempeh and impart flavor, bring 5-6 cups of water to a simmer, add in the sliced ginger and garlic, tamari, salt and tempeh. Simmer for at least an hour. Once softened, drain the tempeh and let dry and cool down on a tray.

To make the stir fry, heat a wok over med-high heat, add in a tablespoon of coconut oil and stir fry the tempeh in two batches. Make sure to let both sides get evenly browned. Once the tempeh is fried, set aside. Now do the same with the yellow potatoes. After the potatoes are fried, add a little more coconut oil to the wok if necessary and then add in the white onions and carrots. After 1-2 minutes, add in the cauliflower, broccoli, green beans and bell peppers. When the vegetables are evenly cooked, add in the tomatoes and then the minced garlic and ginger and stir fry until aromatic, around a minute. Next, add in the tempeh, potatoes, red curry paste and coconut milk. Stir until all of the veggies are evenly coated. Serve over warm basmati rice, or your favorite noodle and top with the julienned green onions.




Friday, September 5, 2014

Vegan Zuppa Toscana

A few years ago, when I would frequent Olive Garden, I loved ordering the soup and salad combo. It was always a toss up between the Minestrone and Zuppa Toscana. Usually Zuppa Toscana won out, and just recently a thought flickered into my head telling me to recreate the soup. Just a lot healthier and of course, vegan. It was actually really easy to put together, but is definitely not a "healthy" soup. Save this one for when you are feeling indulgent or when you want a really hearty soup that will leave you satisfied.


I chose to use this homemade veggie sausage recipe from Yumuniverse, feel free to use your favorite.

You'll need:

2 c cooked veggie sausage
4 russet or yellow potatoes, cubed
1 onion, diced
4 cloves garlic, minced
3-4 c veggie stock
1 c thick nut milk, I used homemade cashew
1/2 package veggie bacon, cooked (optional, but worth it, can use tempeh bacon for a gf option)
5 stalks de-stemmed and roughly chopped fresh kale (spinach would be great, too)
coconut oil for sauteeing

Cook your veggie bacon and sausage (large crumbles) in a large stock pot, seperately in the coconut oil. Set aside. Saute the onion, in the pot, until translucent then add in the garlic and saute for an extra minute. Deglaze the pot with the veggie stock then add in your potatoes. Cook on medium until potatoes are almost tender, then add in the veggie sausage, half of the bacon and the kale. Add in the cashew milk and season with salt and pepper. Once the soup is ladled into bowls, top with the extra veggie bacon. Enjoy! 


Monday, September 1, 2014

Choco-PB Breakfast Cookies

I'm always looking for an easy breakfast for my kids. I usually make double batches of waffles, pancakes or muffins on lazy days but that can get boring.  A few years ago, before we cleaned up our diets, a quick breakfast I would give the kids was a popular, store-bought "breakfast cookie" that I thought looked healthy. I was incredibly wrong. They were full of GMOs, trans fats, artificial colors and flavors, and a whole mess of chemicals. My version of breakfast cookies contain none of that and are made with only 7 ingredients. They're also naturally gluten free. Add the delicious glaze if you feel the need to indulge a bit, they are tasty either way.


Choco-PB Breakfast Cookies

For the cookie

1 c ground oats (can be ground in a food processor, blender or coffee grinder)
1 1/2 c old fashioned oats
1 c nut butter (I used PB)
1/4 c maple syrup
1 tsp vanilla extract
1/2 tsp salt (my favorite is real salt)
3 ripe, smashed bananas 
1/3 c dark chocolate chips 

For the glaze

2 T maple syrup
2 T cacao
1 tsp coconut oil
2 T peanut butter

Preheat your oven to 350F. Mix the wet ingredients with a wooden spoon until combined. Add in the salt, ground and whole oats, stirring until incorporated, then fold in the chocolate chips. Spoon 1/3 c batter onto baking sheet, making large, round cookies, 2-3 inches wide. Bake for 20-25 minutes or until lightly browned on top. (sometimes I broil them on low for a minute to get a golden color on top) 

Let cool on a wire rack before adding the glaze.

To make the glaze, I used a double broiler, added all of the ingredients to the bowl and whisked until combined. Spoon the mixture into a ziploc bag, snip a tiny corner off the bag for piping, and decorate the cookies in whatever pattern you like.

This recipe makes 10 large cookies.


Wednesday, February 12, 2014

Buffalo Cauliflower Bites


My husband is in love with spicy food. He puts jalapenos on almost everything. So needless to say, he is always asking for dinners with a little more kick. These buffalo cauliflower bites are one of his favorite things, seriously, he asks me to make them daily weekly. I'd like to say these are healthy, but the cauliflower really doesn't rule out the high salt content, so we limit how many of these we eat. 


You could definitely lower the heat factor of the sauce by adding in some coconut oil or vegan margarine. I love serving the bites with some cashew ranch and organic celery.


After cutting up the cauliflower, you'll thoroughly cover them in a simple batter and then bake the pieces.


You'll need:

1 head of cauliflower, cut into bite size pieces
1 c flour (whole wheat, brown rice, chickpea, etc)
3/4 c nut milk or water (I use cashew milk)
2 t garlic powder
1 c cayenne based hot sauce

Let's get started!

Preheat your oven to 425F. In a medium sized bowl, mix the flour, nut milk and garlic powder together. Dredge each piece of cauliflower in the batter and lay on a sheet pan. Bake for 15-20 minutes, or until lightly browned, and let them cool for 5 minutes. Add all of the pieces to a large bowl and then pour hot sauce on top. Gently mix the cauliflower around until all are covered with sauce. Pour the cauliflower back onto the sheet pan and bake for an additional 5 minutes. 


Monday, February 10, 2014

Tropical Green Smoothie


Iron is essential in keeping our bodies healthy. It strengthens our immune systems, treats insomnia and helps with concentration. It's also a key factor in preventing anemia. What you may not know is that for our bodies to absorb Iron properly, Iron-rich foods (plant based ones, like whole grains, beans and veggies) should be accompanied by Vitamin C rich foods when eaten. When digested together they form a compound that makes the Iron more absorbable. This Tropical Green Smoothie gives you the best of both world.


I recently bought a case of oranges and had planned to juice them all. But then I got to thinking about how Iron needs Vitamin C  to be absorbed and then this smoothie was born. I was very surprised at how tasty it was because I put a lot of spinach in it. But the sweetness of the fruit really mellowed out the bitterness of the greens.


You'll need: 

2 c fresh, baby spinach
2 bananas, fresh or frozen
1 c pineapple, fresh or frozen
1 c freshly squeezed orange juice (I hand-squeezed 3 oranges)

Let's get started!

Blend the orange juice and spinach until smooth. Add in the fruit and blend until creamy. This makes about 3 cups.


Sunday, February 9, 2014

Hearty Vegetable Soup


In the winter, I make soup 4-5 times a week. It's my favorite go-to meal and with a little help from the slow cooker, it makes my nights a bit less busy. I've been making this soup for years, but recently cut out chunks of tomato in favor of adding just tomato paste. My kids enjoy it much better that way. For some reason the chunks of tomato were not appealing to them. This recipe is very easy, yet flavorful, I hope you enjoy it.
To make life simpler, grab a bag of organic mixed veggies instead of cleaning and chopping fresh.

Hearty Vegetable Soup

You'll need:
1 jar of tomato paste, such as Bionaturae
1 c chopped carrots
1 c chopped celery
1/2 c peas
1/2 c corn 
4 c vegetable broth, or more
1 chopped bell pepper
5 cloves garlic, pressed or smashed
1 c green beans
1 medium onion, chopped
4 red potatoes, quartered
Option: add in your favorite beans

Let's get started!

For stove top

Throw your onions, garlic, celery and bell peppers in a pot ( medium heat) with 1/2 c of water and sauté for 3-4 minutes. Add in the rest in the rest of the veggies, tomato paste and broth, and let boil for 10 minutes. Lower heat and cook for 45 minutes to an hour, or until everything is cooked through. Season with salt and pepper, if desired.

For slow cooker

Throw all ingredients into a slow cooker and set for 6 hours. That's it! 

Raw Cheesecake with Almond and Cacao

This cheesecake is delicious and easy to make. It's perfect for when you want something sweet but don't want the naughty feelings afterwards. Made with no gluten, no oil and no refined sugar, you'd think it would taste bland and boring, but that's definitely not true. Dates, almond butter and cacao give this little cake an enormously scrumptious flavor. A dehydrator isn't necessary and all you need is a blender, food processor and a freezer. 


You'll need:

Crust
1 c raw cashews
1 c raw almonds
1 c soft, pitted dates
2 T cacao powder

Filling
2 c soaked, raw cashews
2 T raw almond butter, like Artisana
1/4 c lemon juice
1/2 c date paste* or raw coconut nectar, such as Coconut Secret
1 c water
1 t vanilla bean powder or 2 t vanilla extract
1 t cacao powder

* date paste: 2 cups pitted and softened dates blended with 2 c water

Let's get started!

To make the crust, pulse the almonds and cashews until they are broken down into small pieces. Add in the dates and cacao and pulse until combined and the mixture holds its shape. Press into the bottom and up the sides of a spring-form pan, or for mini cakes, press into the bottom and sides of a muffin tin. 
To make the filling, blend all of the ingredients except the cacao powder until smooth and silky. Pour all of the mixture, except 1/4 c, over your crust. Add the tsp of cacao to the leftover mixture and blend until combined. 
Now comes the fun part. With a spoon, drizzle the filling over the cake, in lines. Try to get them as close together as you can. They definitely don't have to be perfect, because you are about to mess them up.
Now, grab a toothpick, or a skewer, and use it to make perpendicular lines through the batter, changing direction every line (up and down).
After you've finished decorating your cheesecake, cover it and place in the freezer for 4-5 hours to set. Let it thaw out for 15 minutes before cutting. The cheesecake can be stored in the freezer for up to two weeks. I usually cut it up and store slices individually for easy access. 


Saturday, September 14, 2013

Spicy Tempeh Hash

I love a good breakfast. But who doesn't? Growing up in the South, a staple for breakfast was always potatoes, some kind of meat, a bread with gravy and eggs. Sometimes fruit. Now that our family eats plant based, I usually make pancakes with a smoothie for breakfast. I can hide so many healthy ingredients in pancakes! But having the same thing over and over again definitely gets boring. So when I came across this recipe in the Vegetarian Times, I was overjoyed. We don't eat much soy, but every so often I"ll cook with organic tempeh.


I pretty much followed the recipe as written, I just added sage and more paprika, peppers and onions. I also used organic coconut oil instead of canola. I doubled the recipe for our family of 5. I served it with some Ezekeil sprouted toast and fruit and fresh juice. It was a hit. And very easy to make.

Thursday, September 5, 2013

Veggie Pizza with a Bonus!


Happy National Cheese Pizza Day! Somehow, that sounds weird saying. You know, because I don't eat "real" cheese. And I don't miss it. Although, it was the hardest and last thing I gave up in pursuing a vegan, plant-based lifestyle. But I don't miss what it represents or how it made me feel after I ate it. Blech. 


Anywho, I AM a lover of all things cashew. Especially cashew cheese. And today, I have a recipe and pictures that will make you love it, too. If you haven't already tried it. 

Have you ever seen Despicable Me? It's an adorable and hilarious movie that my kids love. Honestly, I love it, too. We don't watch much TV, but I'll sit down to watch it with them if they ask. So, as a result, I have a lot of the lines memorized. Like, one from this scene…


So, now every time the kids get sassy with me, for some reason, I've been saying, "I'll stuff you all in the crust!" Well, after one such incident, my husband and I looked at each other and said, "OOOhhhhh, stuffed crust!" And I knew, it had to be done. 

And it was a success. I stuffed that crust full of cashew cheese, rolled the sides up and sealed it. Super easy. And then I topped it with vegan, Italian Field Roast Sausage, and made it sinful.


BUT, I had to redeem my veggie-loving self, with something a bit healthier. So I made this:


And it was just as amazing, if not better. 


For the pizza crust, I adapted this recipe to fit my needs. I doubled it for the two pizzas. 

This recipe is for ONE crust.

1 tsp coconut sugar
1 1/2 c warm water
1 Tbsp active dry yeast
1 Tbsp coconut oil, or extra virgin olive oil
1 tsp salt
1 tsp garlic powder, optional
1 tsp onion powder, optional
3 1/2 c sprouted wheat flour (doesn't have to be sprouted)

Preheat your oven to 425*. Add the sugar to a large bowl and pour warm water over. Stir to dissolve the sugar. Sprinkle the yeast over and wait around 5 minutes, until it starts to bubble. Then add in the oil, salt and spices. Then add in the flour 1/2 c at a time. Once your dough gets thick, take it out of the bowl and knead until smooth, about 5 minutes. Oil a large bowl, preferably glass, and place the dough ball in it. Cover the bowl with a warm, wet dish towel and place in a warm space for an hour. After the dough has risen, punch it down and knead into a ball again. Place a newly warm, wet dish towel over the bowl for another hour. The double rise is key for the whole wheat crust, at least in my experience with this recipe. Now you can roll out your dough onto a floured surface into whatever shape you like.


For the sauce. I made two and then combined them. I made a simple marinara and a spreadable cashew cheese.

For the marinara:
4 c chopped tomatoes
1 large onion, diced
3 cloves garlic, minced
2 Tbsp coconut oil, or extra virgin olive oil
1/2 tsp oregano
1/2 tsp marjoram
1/2 tsp sage
1 Tbsp chopped basil
salt and pepper to taste
Saute the onion and garlic in the oil, in a large pan, until translucent. Add in the tomatoes. let simmer for 30 minutes, to thicken. Then add in the spices. 
For the cashew cheese:

1 c raw cashews, soaked for a few hours, then rinsed
1 Tbsp nutritional yeast
2 Tbsp basil, chopped
1 Tbsp lemon juice
2 cloves of garlic
1/4-1/2 c water
Combine all of the ingredients in a high speed blender or food processor. Blend until smooth. Add more water, if needed.


To assemble the pizza, roll out your dough into your desired shape. Poke the crust a few times with a fork. Mix the marinara and cashew cheese together, if desired. Spread out onto the dough. Or just layer them. Then start adding toppings. I added yellow squash, heirloom tomatoes, red and green peppers, portabella mushrooms, red onions and jalapenos. Bake at 425* for 15-20 minutes, or until crust is golden brown.


Thursday, August 15, 2013

Cold Italian Pasta Salad


We eat a lot of cold salads in the summer and this one is one of my favorites. It's easy to make and is great to take on picnics, pack up for lunch at work or send in your kid's lunch box. Sometimes we have it for a quick and light dinner. It's very versatile, feel free to add in extras of your favorite raw veggie.


Cold Italian Pasta Salad

You'll need…

2-3 cups of your favorite pasta
1 1/2 c Italian Dressing (see my homemade recipe below)
3 c chopped and raw veggies
(I used shaved carrots and cucumbers, chopped broccoli, cauliflower, bell peppers, red onions and cherry tomatoes)

Let's get started!

Cook your pasta and then rinse under cold water. Add in veggies and dressing and toss together. Refrigerate for at least 3 hours before serving.


Italian Dressing
(adapted from Crazy, Sexy Kitchen  )

1/2 c extra virgin olive oil
2 tbsp coconut nectar or other liquid sweetener
1/4 c apple cider vinegar
1/4 c lemon juice
3 garlic cloves, minced or pressed
1/4 c chopped onion
1/4 c chopped red bell pepper
1 tbsp chopped herbs (parsley, oregano
salt and pepper to taste

Add all ingredients to a mason jar then shake vigorously. Will keep in refrigerator for up to two weeks.


Monday, July 29, 2013

Baked Gluten-Free Falafel


When my husband lived in Turkey, he picked up a fondness for falafel. Falafel wasn't really in my meal rotation… until I made these. They are a healthier version of traditional, but just as tasty. And they were a hit with the whole family! I made a tzatziki sauce to drizzle on top I just switched coconut yogurt for the greek). I also topped them with a salad of tomato, cucumber, lemon juice, salt and pepper. We used bibb and romaine lettuce along with pitas to wrap the falafel in. 


You can find the recipe for the Quinoa and Kale Salad here (pictured below)


Baked Gluten-Free Falafel

You'll need...


3 cups cooked chickpeas or 2 cups soaked overnight
3 Tbsp chickpea or brown rice flour
1 Tbsp cumin
1/4 c chopped parsley
1 tsp coriander
1 small onion
4 garlic cloves
5 green onions
salt and pepper to taste

Let's get started!

Preheat your oven to 375*. Pulse the chickpeas in a food processor until it becomes a thick paste. Remove and scoop into a large bowl. Add the rest of the ingredients to the food processor and pulse until a paste forms. Mix thoroughly with the chickpeas. Shape dough into 1 inch balls and press flat to make a disc. Lay onto a baking sheet and bake for 35-40 minutes, flipping once, or until both sides are brown. Makes around 25.